
 Replacing your old, worn or otherwise undesirable factory stock with a new Stocky's® stock is a very enjoyable and satisfying part of owning a fine firearm. Generally accomplished in just a few minutes on the 'kitchen table', professionals worldwide agree it's the simplest and fastest way to not only improve the appearance of your rifle, but also results in at least 5 very important improvements:
- Better handling (more bench-friendly or faster to the shoulder);
- Superior accuracy (better bedding systems, more precise inletting than inexpensive wood or plastic);
- Improved stability (elimination of warpage) under more diverse conditions;
- Ability to hold a zero over a number of years;
- Better durability than average wood or plastic stocks.
We find a DIY stock installer is generally one to be feared by man and beast. Doing so nourishes an intimate familiarity with with the rifle and anyone bearing such an arm presents a glow of confidence and precision. We notice an enhanced pride of ownership, inherent with the possession of a truly custom firearm. We think you'll agree it goes a long way to enhance a particular sense of self-confidence that can only be accomplished through the agonizing selection and subsequent self-installation of the right stock for the conditions. But don't brag too loud, most of our customers tell us the actual installation is the easiest part!
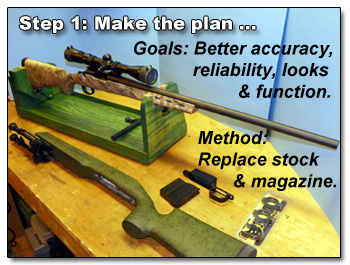
To begin, you'll want a plan. Nothing is more frustrating than getting your newly restocked rifle all sighted in only to discover that you must take everything apart to replace something you should have done now. (You may recall from our Making the Shot discussion that turning any screw once sighted in voids Stocky's® One Shot - One Kill guarantee.)
In other words, if you think you want that Wyatt's Drop-Clip Assembly, to adjust or replace your trigger, it would be best practice to install it with the new stock. Remington 700 and Winchester 70 triggers can be adjusted down to under 3 pounds and set very crisply by design. An AOL search will result in 21,900 links to adjusting a Remington trigger, here's one of Stocky's favorites.) Similar results may be had for others.
 Step 1: Once you get your parts, the first step will be to disassemble the rifle down to its barreled action. To begin, make sure your work area is free of clutter and has plenty of room to set the old stock, new stock and any other parts you are upgrading. Best practice indicates that the stock with the barreled action attached be mounted in a bipod or placed in a gun vise for ease of access, but this is not mandatory as long as the surface you are working on has an adequate pad (such as an old bath towel) to avoid damaging either the stock(s) or the dining room table when you accidentally drop something on it.
These photos came from one of our customers, John Morgan. Aside for wanting to put credit where credit is due for the excellent photography, I wanted to show you the simple but excellent craftsmanship of his home made gun vise - Great job John!
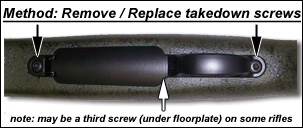
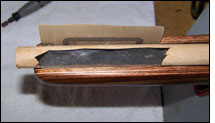
Turning the rifle bottom-side up will reveal what are commonly referred to as the takedown screws. We call them screws rather than bolts to avoid confusion with the cartridge bolt, and refer to them as the takedown screws because they are the ones that release the barreled action from the stock. There's usually two screws if you have a one piece floorplate, three on blind magazine stocks and two-piece floorplate models (extra one is to hold the trigger guard on and should be kept only as tight as necessary to do so. This is the rear screw on Savage rifles, center on most others.)
 Step 2: Start the disassembly by removing the cartridge bolt (the one you use to load it) from the receiver, then removing the takedown screws. Note the differing sizes of the screws and be sure to use the correct one in the correct spot when reassembling.
Removing the takedown screws may allow your parts to literally fall out of your old stock so please do so with care! It is best practice to pause at this point to make a mental note of how it all fits together. Especially useful, if you plan to reuse the magazine parts, it to note how the magazine box snaps into a recess in both the receiver and the bottom metal.
If you are upgrading a blind magazine rifle to another type of bottom metal configuration, you may find the magazine box is attached to the receiver with a small tab screw. Locate it and remove. Set the parts you will reinstall aside, and the ones you will not be using elsewhere to avoid any confusion.
This will leave you with the barreled action, magazine box and trigger guard and/or bottom metal assembly along with the screws. It's O.K. to leave the magazine spring and cartridge follower attached to the floorplate, but it can be removed by simply sliding the spring out of its raceway if you like.
Step 3: If you are reusing these components simply reassemble in the reverse order you removed them. If you are replacing them with a new bottom metal assembly of some sort use the new part(s) in lieu of the old ones.
We rarely find that a 700 stock needs adjustment, but sometimes the old screws are too short, too long, a (custom) trigger or barrel has to have a slightly larger channel sanded into the stock to fit properly. These are addressed below, plus there are some common accuracy enhancements on our Fitting / Bedding page. It is perfectly acceptable to make minor adjustments to any wood or fiberglass stock so things assemble correctly.
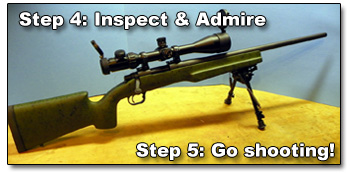 Step 4: Now spend a minute to replace the bolt and make sure everything operates correctly. We always recommend operating the bolt, safety, floorplate and trigger (dry-firing is fine on a centerfire, not on a rimfire) immediately and address any issues.
Sit back and admire your creation! You are now the proud owner of a truly customized firearm, simple, easy, quick and best of all you've saved hundreds off the factory price and you got to pick just the right components for your shooting style. We strongly recommend you use the savings to get started on another one ...
Now, assuming everything operates correctly (always check for safety, fit and function on any aftermarket part, including the stock) head to the range and shoot it! We do not recommend bedding, free floating barrels or anything until you get a couple dozen groups, with a variety of loads, downrange. 99% of the time you'll find that you do not want to touch a thing! Stocky's® favorite saying is if it ain' t broke, don't "fix" it (he'd be better off to practice what he preaches, too.)
 Troubleshooting, Tips & Tricks: Before you go any further, if there's something that is obviously amiss stop and review. Some folks accidentally order the short action stock when they require a long. Sporter stocks cannot generally be opened up enough to fit varmint barrels. Call our Tech Support Hotline with questions before you carve!
Since our stocks are more precisely machined than many others, we get a report here and there something could use a bit of tweekage. 90% of those are due to the customer's metal, not the stock. If you have a custom barrel (i.e. Lilja, Hart, Krieger) or trigger (i.e. Timney, Jewel) it's best to plan on fitting it.
The mode of attack is basically to simply see what's hitting where, and remove stock material where necessary to get it to get it perfect. Should one need to determine the spot, a dab of axle grease on the metal will transfer to the offending wood to see where it's touching. Makeshift tools like 100-150 grit Stick-N-Sand sandpaper (Home Depot) cut to size and stuck around a dowel or pop sickle stick are the best for these minor adjustments, not expensive gunsmithing tools. Occasionally I'll use a Dremel to touch up a spot in the inletting, but it's very rare.
Barrel Fitting & Floating:Note- We neither floating your barrel nor barrel contact. The best method is to shoot it the way it comes out of the box ... you may find you don't want to touch a thing!
 Factory Original Barrels - Most barrels come in either Sporter or Target/Varmint configurations. Sporters are either standard or magnum tapers, the heavier ones are usually standard but some specialty barrels (i.e. Remington's 5r mil spec.) are a bit larger. Putting the smaller one into the slightly larger channel presents no special requirements (you may want to 'glass the first couple inches), the dowel & sandpaper fitting method shown will give you the best results if you are doing the reverse.
Factory Floorplates: Most manufacturers 'part-out' many of their dimensionally non-critical parts. This sometimes results in a less-than-ideal fit as our stocks are cut to standard factory inletting specification and often held to tighter tolerances than mass-produced factory parts. We recommend simply removing small amounts of stock material to achieve a perfect fit if yours is too large.
Floorplate Fit / Operation - If the hinged part is sitting too deep in the bottom of the stock it may be difficult to get that little button to latch on to the magazine cover. The addition of a thin stainless washer (check the old stock, many times there's one the factory used still stuck to the stock) slipped over the screw between the metal and the stock (not over the head of the screw) raises the floorplate just enough to allow thinks to snap shut.
Magazine Box - Most modern factory rifles use the floorplate to hold the magazine box in place, it simply fits in to the recesses in the receiver and floorplate. A slight looseness is normal, it won't be loose when you have it loaded. Sometimes you have to pinch it slightly with your fingers to snap it in place. It is usually easier to insert the mag box into the receiver and hold it in place temporarily with a couple pieces of blue tape on the inside while inserting the barreled action into the stock. Remove tape after assembly. (Detachable magazine systems are one-piece, simply remove the clip and insert the bottom assembly into the stock.)
Takedown Screws: Takedown screws are the ideal length when they are flush with the inside/top of the receiver hole they screw into when fully torqued. If you are looking for precision, Seekonk sells the ideal pre-set 1/4" ratchet T-handle Torque Wrenches for about $65.
Torque Values: Solid wood - 25-30 in/lbs; Laminates 25-40 in/lbs; Fiberglass 30-40 in/lbs; Aluminum - 50-60 in/lbs - Tighten the front screw last, this puts any residual stress to the rear, away from the locking lugs.
- If your cartridge bolt binds or won't close properly, your takedown screw(s) are too longand protruding into the receiver. Shine a light into the locking lug recess and look. Back the screws out a few turns to confirm, and simply file them off a bit. It is not due to the stock.
- If your screws are too short, we have XL screws.